I really only touched on the subject in my Grandia post and, since I’ve been having difficulties figuring this thing out for myself, now that I finally did, I decided I should write up a full guide to help others. So here goes…
How to transfer your save from the PSP to an emulator
To do this, you need mostly just one tool – MemCardRex
MemCardRex
MemCardRex is a tool made by Shendo. It allows you manage the content of PlayStation memory cards in various file formats. It cannot write to all of the formats, but it can read from most of them. Here’s a list of formats it supports:
- ePSXe and PSEmu Pro Memory Card (*.mcr)
- DexDrive Memory Card (*.gme)
- pSX and AdriPSX memory Card (*.bin)
- Bleem! Memory Card (*mcd)
- VGS Memory Card (*.mem, *.vgs)
- PSXGame Edit Memory Card (*.mc)
- DataDeck Memory Card (*.ddf)
- WinPSM Memory Card (*.ps)
- Smart Link Memory Card (*.psm)
- MCExplorer (*.mci)
- PSP virtual Memory Card (*.VMP) (read-only)
- PS3 virtual Memory Card (*.VM1)
It also supports a couple of single save file formats, such as:
- PSXGame Edit single save (*.mcs)
- XP, AR, GS, Caetla single save(*.psx)
- Memory Juggler(*.ps1)
- Smart Link(*.mcb)
- Datel(*.mcx;*.pda)
- RAW single saves
- PS3 virtual saves (*.psv) (importing only)
As you can see, it supports a lot of stuff. However, we are only interested in two things. It can edit various emulator memory card files, such as ePSXe, pSX and PSEmu and it can read from the PSP virtual memory card file. Sadly, MemCardRex cannot save to or edit a PSP virtual memory card file, which means we can’t use it to transfer saves back to the PSP, but there’s a solution for that.
By the way, if this is your interest, MemCardRex can also be used to transfer saves to and from an actual physical PlayStation memory card through its support for the DexDrive, but that’s not something I can help you with.
- Shendo’s Software – MemCardRex 1.6, Transfer Saves from the PSP to the PC
- Blogging Games – MemcardRex 1.6
- MediaFire – MemCardRex 1.6
How to find your PSX save on your PSP
The first thing you need to do is to figure out which of the many folders on your PSP represents the memory cards belonging to the game you’re trying to transfer the saves from. This can be hard, because the folders aren’t named after your game exactly. Instead, they are named after the ID of your game. You can get the ID off the back of your game case, but in case that’s not an option, you’ll have to do some guessing.
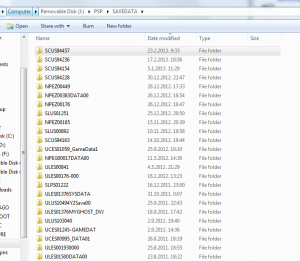
What I did was to save my game for one last time and then connect my PSP to the PC. I went to my PSP´s files and found the PSP/SAVEDATA folder. This is where all of my PSP saves are. What I did was to sort this folder by Date Modified.
Obviously, since this was the last save I saved, the folder of the save would be the most recently modified one. In my case, for the game Grandia, the folder was SCUS94457. This is the Game ID and it will also be important for later, so remember it. If you’re still unsure, open this folder and look for the file named ICON0. This is a tiny image somehow related from your game, probably the box art or a character from the game. If it matches, then you can be sure. In my case, it doesn’t match because I got the ISO online and not from your regular sources.
In any case, copy this folder to your pc. The two files you actually need are
SCEVMC0.VMP, SCEVMC1.VMP
However, you might as well copy the entire folder since the files are tiny.
How to transfer the save from the PSP memory card to ePSXe
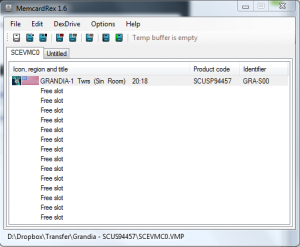
Once you have them on your PC, it’s time to open up MemCardRex. The second icon on the MemCardRex toolbar is the open button. Use this to first open your PSP memory card file. Since you’re probably saving your game to the first memory card slot, you should open up the file SCEVMC0.VMP. Once you have it open, you’ll see all your saves for that game. You won’t see any saves for your other PSX PSP games because the PSP creates a separate virtual memory card for every game. Again, here’s an example with Grandia:
Now that you see your save, you need to decide if you want to create a new memory card file to transfer it to or if you want to transfer it to an existing memory card file. In the example of ePSXe, the memory card files are located in your ePSXe folder under the memcards sub-folder. If the files aren’t there and all you see is a file called delete.me, this means you haven’s used ePSXe yet and the memory cards haven’t been created yet. In that case, you can run the bios on ePSXe once to create them, or you can simply create them in MemCardRex.
To put it shortly, once you’ve opened your PSP memory card file with MemCardRex, you need to either open your ePSXe file as well, which is again the second button, or you need to click on the first button to create a new memory card. In both cases, the memory card file you’ll be transferring to will open up in a second tab.
Now go to your first tab, right click the save file you want to transfer and pick “Copy save to temp buffer”. Then, go to the other tab, right click on any empty slot and click “Paste save from temp buffer”. After that, all you need to do is to click on the save button in the other tab (third from the left) and pick your location, file name and format from the drop-down list. Now you have your new save ready to play in the emulator of your choice. Of course, you need to transfer the save to the proper location for your emulator and then select it your save in the emulator settings.
How to transfer the save from ePSXe to the PSP
For this, sadly, MemCardRex won’t be as useful. Sadly, the tool is unable to edit PSP or PSP Go memory card files. It can only read from them right now. Instead, we will need something else. To transfer saves from ePSXe to the PSP, you need
- A custom firmware on your PSP, which supports plugins
- The CWCheat plugin
- The CWCheat database files
First of all, you need to locate your emulator save and name it correctly. Remember that game ID I mentioned in the previous step of this guide? Well, the emulator save needs to be named properly for the import to work. It’s relatively simple to explain, but here’s an example with Grandia:
- The Game ID was SCUS94457
- If you want to transfer it to your first memory card slot, name it SCUS_94465-0
- If you want to transfer it to your second memory card slot, name it SCUS_94465-1
Leave the extension as it is, which is .mcr in the case of ePSXe. In my case, the file name was SCUS_94465-0.mcr.
You now have your save. What you need next is the CWCheat PSP plugin. If you don’t know how to install it, you might want to look up another guide, but to put it shortly, you need to download it from the locations bellow and then do several things.
First, you need to copy the folder cwcheat to the seplugins folder on your PSP. Then, you need to open up
game.txt, vsh.txt
And in each of those files, add the line
ms0:/seplugins/cwcheat/cwcheat.prx 1
In the file
pops.txt
Add the line
ms0:/seplugins/cwcheat/cwcheatpops.prx 1
If you’re like me and have a PSP Go, then you should probably install to your PSP Go memory, instead of the Memory Stick. In that case, instead of the lines starting with ms0:/, you need to have them start with ef0:/.
This will then look like
ef0:/seplugins/cwcheat/cwcheat.prx 1
Additionaly, for the PSP Go, the default cwcheat plugin doesn’t seem to work. Instead, you need the plugin from the alternative link bellow. That one definitely worked for me, so it should work for you as well.
Lastly, you need to download the CWCheat database files bellow (both of them) and put them in the folder
/seplugins/cwcheat/
The two files will be named cheat.db and cheatpops.db. It might work with the default database files, but this is just to make sure.
- Blogging Games – CWCheat 2.3
- Blogging Games – CWCheat PSP Go 2.3
- MediaFire – CWCheat for the PSP
- MediaFire – CWCheat for the PSP Go
- CWCheat database files (you need to unzip them)
Finally, with everything ready, get the save you previously named properly with these instructions and copy it to
/seplugins/cwcheat/mc
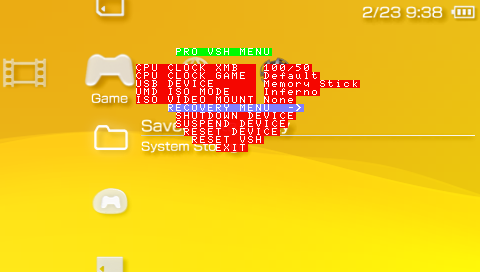
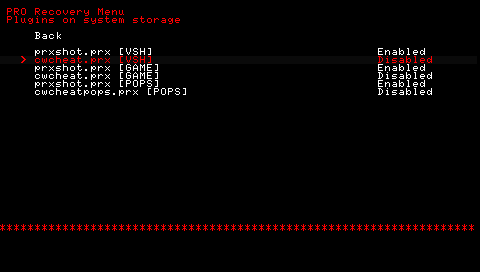
Now it’s time to disconnect your PSP from the PC and go to the XMB. From there, first push select to see your VSH menu. From there, select “Recovery Menu” and go to “Plugins”. If you’ve done everything correctly, you should see the three cwcheat plugins on your list as enabled. In my case, I didn’t put at the end of the lines in the three .txt files, so they are here, but set to disabled. Luckily, I can enable them from here.
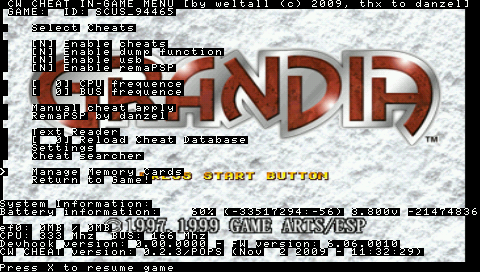
Finally, just to make sure, select Reset VSH. Once you’re back, go and run your game. I ran Grandia and got to the tile screen (where it says “Press Start”). Once there, press and hold select for a few seconds. If everything was done properly, the CWCheat menu should now appear.
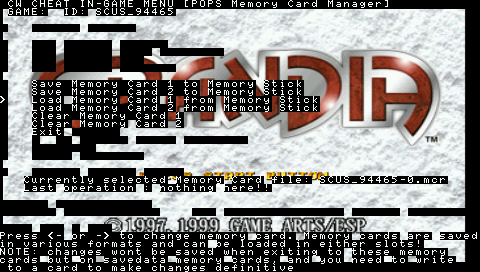
From here, select Manage Memory cards. Again, if you named your ePSXe file correctly and put it in the correct folder, it should be listed at the bottom, under “Currently selected memory card file”. All you need to do now is to select “Load memory card 1 from memory stick” to copy the currently selected file to the first slot of the game’s memory card. You can, of course, also load it to the second slot. Once that is done, exit the CWCheat menu and load your game from the game’s main menu. Your save should be there.
At this point, I usually load up the game and save it once, just in case, but I don’t think that’s really needed. You can now disable your CWCheat plugin if you want to, or you can leave it on, it makes no difference. You’ve just transferred an ePSXe save to the PSP.
NOTE: You could also use CWCHeat to transfer the saves in ePSXe format (.mcr) to your PC, without needing MemCardRex or anything else. You just need to select “Save Memory Card X to Memory Stick” and the .mcr file will show up in
seplugins/cwcheat/mc
However, If you aren’t interested in copying the save back to the PSP later, the MemCardRex method is probably simpler, since you don’t need a hacked PSP for that part at all.
NOTE2: You could also use the entire procedure to transfer saves between the PC and the PS3 or even the VITA, by using the PSP as a proxy. In those cases, once you got the saves back on your PSP with CWCheat, you can just copy them to the Vita or PS3, since the format will already be correct by that point. MemCardRex can also save to the PS3 memory card format, so for that part, you don’t even need the PSP or CWCheat, just a memory stick and the ability to read it on your PC.
