Might and Magic Book One is not a newbie friendly game, so I thought I could write a quick walkthrough for it, giving you all you need to do to get from the start of the game to the end of it. Of course, there’s plenty of optional stuff this guide doesn’t cover, but there will be another guide for that to.
Notice!
This is a guide for the main content of Might and Magic Book One. If you’re interested in a the optional content or the maps, you can find those at one of my other pages:
Caution!
Other than first few sections, the rest of this page will majorly spoil Might and Magic Book One to you. The game is by far the most fun if you figure it out on your own, so I recommend you to stop reading this guide after the Useful Spells chapter. Feel free to do it anyway, but I urge you to reconsider. You’ll be cheating yourself out of a large amount of enjoyment by following a guide the first time around.
Table of Contents
- Party Creation Guide
- Sorpigal
- Erliquin
- Merchant Pass
- Dusk
- Portsmith
- Algary
- The Secret Stronghold in the Enchanted Forest
- A-1 and Castle Doom
- E-3 and Castle Alamar
- The Soul Maze
- Getting the Coral Key
- Getting the Key Card
- The Astral Plane
Party Creation Guide
It’s simple. You should go with one of each class. Since there are six character slots and six classes in total, there really isn’t anything to think about. In subsequent playthroughs, feel free to try alternative party builds, but with your first run, one of each class is the easiest approach.
Your first two slots should go to the paladin and the knight. I find that the fourth slot is more often in melee range than the third slot, so you might want to put your rogue there, though depending on his attributes, they might be better off in the back, using his ranged weapon. The other slot should be filled by a cleric.
In the last two slots, put your archer and your sorceror. Again, the sixth slot seems to get into melee range more often, but I can’t be sure. In any case, your sorceror is the squishiest character, so they should be in the back.
If you want to have it easier, make all your characters female. There’s a town in the game which is very difficult on male characters. You can reverse your sex in the game later, but making them all female to begin with is the easier approach.
As for the alignment of your characters, mix it up however you please. Some spells and quests are affected by alignment, and some items are alignment restricted, but it’s nothing of upmost importance, with one exception being your cleric, possibly.
Might is required by your melee combatants, in order for them to do more damage. While your sorceror will do the cleaning up in the early game, a good knight can do a lot later on. Don’t neglect might on your rogue, like I did. He will be in melee often enough later in the game, so it sucks that mine didn’t do any decent damage. It might be needed for archers to, since I don’t see a damage stat for ranged attacks other than Accuracy, which already has a role, but I’m not sure. My archer didn’t have a lot of strength, but she did decent damage anyway. Still, you can never be sure.
Endurance gives a bonus to health gained on level up, so the earlier you can get it, the better for you. Everyone should have it as high as possible.
Intellect is what your sorceror, and later on your archer need to make their spells more effective. Again, you should have it as high as possible for them. The rest of your guys don’t need it at all.
Personality is for clerics and paladins what intellect is for sorcerors and archers, so approach it the same way. Those two classes should have it, the rest can ignore it.
Speed is useful for everyone, because it allows your characters to act before your enemies and kill them off before they can do anything. A sorcerer with good speed is a godsend in the early game, because they can use their spells to clear out most of the enemy group.
Accuracy is great for everyone except the spell casters. You want and need to hit your enemies, so take it as high as possible.
Luck, as far as I can tell, is only really useful for your rogue, though even there, I’m not sure how useful it is. Traps get set off often enough, regardless of luck, as far as I can tell.
Character Creation Guide
Based on the above, here’s how you should build your classes:
- A Knight needs might, endurance, accuracy and speed.
- A Paladin needs might, endurance, accuracy, personality and speed.
- A Rogue needs might, endurance, accuracy, speed and luck.
- An Archer needs accuracy, speed, endurance, intellect and speed.
- A Cleric needs personality, endurance and speed.
- A Sorceror needs intellect, endurance and speed.
Basically, you want the attributes you use to be as high as possible, and by high, I mean at least above 15 or so. Prepare to do a lot of rerolling.
Later on, you can raise your attributes permanently, as many times as you want, as far as I can tell, though some sources claim it’s only up to 30. There are sources in game for each of the attributes, as well as a quest that resets these sources, allowing you to reuse them.
By the way, races in this game matter so little, I completely forgot they exist until just now.
Or Simply Have Fun
While the above advice is completely true, the premade party is actually good enough to complete the game with, so you shouldn’t really worry about how good your party is. I think my starting party was probably weaker than the premade party and I still managed.
And Don’t Forget to (S)earch!
This is a party that escapes many and something I missed initially. You’re supposed to use the (S)earch command after every battle to find loot. Some random spots in the game also require you to (S)earch regardless of battle, so keep that in mind as well.
Town #1 – Sorpigal
Sorpigal is the first town, where you start the game. The first thing you should do in Might and Magic Book One is to immediately equip your starting equipment. All characters start with a club in their bugs, but they don’t have anything equipped.
After that, go to the inn, which is right in front of you, to save, and then go back out. Start mapping the place to familiarize yourself with everything. Each town has the following facilities:
- The Inn – This is where you save your game.
- The Food Store – This is where you buy food. Each rest recovers your health and magic points, but costs one unit of food per character. In Sorpigal, you pay 5 gold per character to fill up everyone’s stocks of food to the maximum of 40. Sorpigal is by far the cheapest town for food, so use this to your advantage.
- The Shop – This is where you buy equipment. Usually, you don’t have to pay for gear, as far better stuff will drop, but you never now. Each town offers different items.
- The Tavern – You can buy drinks and then tip the bartender to receive information about the game.
- The Temple – You can resurrect and heal your characters, restore their alignment and donate gold in order to have a powerful version of all the protection spells you have available cast on you. You wont be doing the last part until much later in the game. Early on, if you die, it’s better to just reload.
- The Training Center – this is where you level up your character once they have enough experience. When you do this, you pay some money, get more health, magic and spells, and your character is aged a year. Do it, always. There’s no reason to avoid training and that’s where your money should go first.
Character Age in Might and Magic Book One – Is it important?
In short, no. You don’t need to worry about character age. There’s a place in the game where you can reverse it, but more importantly, there’s a clerical spell that can do this for you. By the time age even has a chance of becoming a problem, you will have this spell available for you.
The spell has a chance to fail, adding 10 years to the target instead, but you can just recast it and it’ll go down eventually, or you can just save and reload if it fails.
What to do in Sorpigal?
Go and find a fixed encounter. This is a location that will have enemies every time you reload. Once you do find it, go to the inn to save and fight the encounter. If it goes well, rest and save again, then come back. If it doesn’t, reload and come back. Repeat this until you gain a level or two and some gear.
Once you do that, familiarize yourself with the Light spell, find the stairs to the dungeon below Sorpigal and descend them.
The Dungeon below Sorpigal
The Arena is useless, don’t worry about it. Find the old man in the southeast corner and take his letter. He wants you to go to Erliquin, which is Town #5 on the list, but the second easiest town to visit. The old man is at coordinates 1-2.
Find the Leprechaun in the secret room on the way out of Sorpigal. He’s at location 11-3. Give him a gem and he will transport you to Erliquin, though you should probably be at least level 3 before you do this, since for now, it’s a one way trip.
Town #5 – Erliquin.
The wizard Agar who needs to scroll from the old man is right behind the inn. First enter the inn to save, then enter it again, but refuse to sign in and step through the wall at the back of it. The wizard Agar will give you your experience and send you further on, to the town of Dusk.
Now that you’re in Erliquin, go to the outside, to B-1 wilderness. As usual, find a fixed encounter, which will be slightly higher level here, and repeatedly fight it until you gain a few more levels. Optimally, you would want the Fly spell, but you probably won’t get that high yet. If you do, though, that’s great.
There are two castles nearby, both offering easy quests for some easy experience. The thing is…
C-1 and the Merchant Pass
In any case, train in the Erliquin area for a while. Once you think you can handle a group or Ogres, go to C-1, which is just to the east of B-1. Go to coordinates 5-7 and search the wreckage. You’ll be attacked by a group of ogres or something of similar strength and if you win, you’ll get the Merchant Pass. This item allows you to enter the throne room of every castle except Castle Alamar, and seek quests from the lords.
Doing Quests for Castle Lords in Might and Magic Book One
I don’t think it’s worth it. You get some nice experience, but it’s not exactly a huge amount. Some of the quests are simple deliveries, so you can probably do those, but overall, it’s more time effective to find a good spot and grind.
You’ll make good use of the Merchant Pass anyway, though.
Train for a bit longer, until you get the Fly Spell. You’ve been to a few areas now, so I’m sure you’ll be able to find a good spot to grind. Consider going south from C-1, back to C-2 and enter the cave in the wilderness of C-2, at location 15-11.
The Crazed Wizard’s Cave
This cave has 13 fixed encounters and, if you beat the ogres in C-1, it’s a good way to grind money and experience. After you clear all 13, you can speak to the wizard at the end of the corridor of infinite encounters to the northwest (use Jump to get through), you can get some items and gold as a reward.
Town #4 – Dusk
Once you are able to use Fly or you managed to return to Sorpigal on foot, either use the leprechaun or fly to E-1 to get to Dusk. Once there, go to location 8-0 to deal with your quest further. The elf Telgoran will tell you to find two astral brothers, one in Algary and one in Portsmith. I recommend Portsmith first, it’s easier.
Town #2, Portsmith
Portsmith is at B-3. Fly, or walk from B-1 to get there.
Here, go to secret location 12-2, to which you can get to after dealing with the encounter at 11-0, followed by moving one tile east and two tiles north through the walls.. There, you will find the first astral brother, Zam. He will tell you the first part of the clue – „C-15“.
Town #3, Algary
Algary is at D-4. Once there, go to location 1-1 to find the other astral brother, Zom. He will give you his clue – „1-15“.
Combine the two clues to get a location: C-1; 15-15. Fly there and search the area to get the Ruby Whistle. Not that the message will tell you how many times you need to blow it. My number was 2. It’s probably the same for you, but it might vary.
The Secret Stronghold in the Enchanted Forest, B-3
Fly to B-3 and go to the enchanted forest. The entrance you want is at 10-1. You want to go one step west, one step north and then three steps west to get to the secret stronghold. Once you enter, take the western door, follow the hallway north and go down the stairs. On level 2, go south and through the door into an encounter.
This room will have many doors, but you need to take the southern one on the east wall, the one at 2-5, looking east. Follow this hallway until you find a dog statue and get a huge amount of experience points. Don’t walk away from the statue, though. Instead, search the area to get a gold key.
Time to Train
After this, you’ll have to get into some tough areas, the first of which is A-1. You need to train now, and you need to do a lot of it. A few places to train…
- C-3, Wyvern Peaks – The wyverns here should be manageable by now, so fight them get equipment and fight them some more. Fly to an inn each time you clear the area of encounters and then go back.
- E-4, the dragon encounters – Honestly, if you can deal with these, you can go to A-1 already, but it’s the next logical step after the wyverns don’t do much anymore.
A-1 and Castle Doom
Go to A-1 and take the long route to castle doom. Once you get there, you’ll be offered to enter through the secret entrance – do it.
Once in, go through the spiral corridor. Jump over locations 8-5, 6-6 and 7-10, or you’ll be teleported back to the start. At the center, there will be the imprisoned King Alamar. He will give the Eye of Goros, which you need reveal the fake king who is now in the throne room at Castle Alamar.
To get to the Throne Room, you also need the King’s Pass. Fly to A-2 and get to 0-15 to get the pass. It’s a long trek there, but there are no requirements to get it. Once you have it, it’s time to reveal the impostor.
E-3 and Castle Alamar
If you fly to E-3, you’ll end up at a lion statue, which will ask you for a password. Not knowing it transports you to a dark area nearby.
Go to location 9-2, where a guy will tell you the current password. The password changes every time you come back to the area, so go use it immediately to enter the castle.
Inside Castle Alamar, go to the Throne Room and if you have the Eye of Goros, the impostor will be revealed and you’ll be transported to the Soul Maze.
The Soul Maze
The Soul Maze is an area where the Location spell doesn’t work. The goal here is to map the entire area and then go back to where you started, where a guy will ask you for the name of the impostor. The name is actually formed by the walls of the Soul Maze, and can be read from the map once you complete it. To save you some time, the name is Sheltem. Type it in and you’ll be outside, with the real King Alamar free and ready for you.
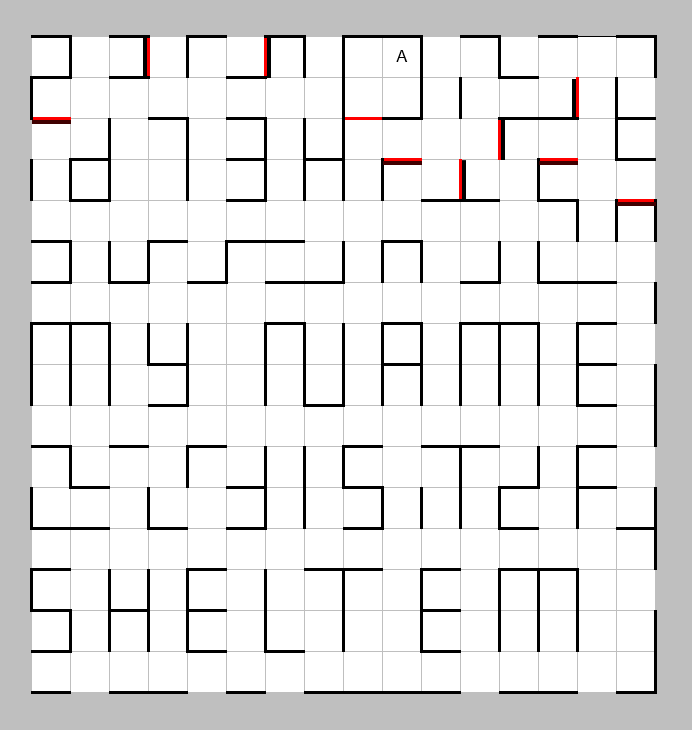
The name, quite literally, is hidden within the walls.
This is an actual point of persistence, so you can take other quests now, or do basically anything and the game won’t reset, like it does with most of the quests.
Getting the Coral Key from A-4
Go to C-2 and visit the small grove with a gypsy in it, right next to the entrance to Sorpigal. It’s at 9-11. He will tell you each character’s color and sign. Write them down, as they change with every reload.
Fly to A-4 and go to location 4-6. The character there will ask you for the signs. You need to answer at least 3 correctly. If you do, you get the Coral Key.
Getting the Key Card from C-4
Go to C-4, use Walk on Water to get to the Volcanic Island and use the Coral Key at 7-2 to enter the Volcano. Once in, go south and go through the two doors. Set the dial in the western room to B and the one in the eastern room to J. If you’re wondering, the dog statue in the Secret Stronghold gave you this hint (Remember B. J.), or alternatively, you can go to one of the cells in the south here and kiss a chained virgin to get the answer to.
Once you set the dials, step on any of the many teleport traps in the area to get to the Volcano God. Ask him for a Riddle and answer Gala. The answer is actually hinted at by one of the many statues in Sorpigal. Answering correctly will teleport you to Sorpigal and give you the Key Card.
The Astral Plane
This is the final area. If you’re high enough level, just cast the Sorceror spell to enter it. If you aren’t high enough level to cast it, then you aren’t high enough level to be here anyway, so go train at E-3.
The goal of the astral plane is to activate all five of the switches and then use the key card to enter the final room and complete the game. The problem is that you can’t use the location spell and you all the walls are barriers, so there’s almost no orientation points.
The best way to get your bearings and at least know the which geographic direction you’re turned towards is to turn north before casting the spell, since you’ll always be going north first once you enter the Astral Plane.

It’s hard to follow instructions without a map, so here’s one of the astral plane.
Switch #1
Once you’re in the Astral Plane, go six steps north until you reach a brick wall. Go two steps west until you reach another brick wall. Now go one step north and four steps west. Then go one step south, one step east, another step south and two steps east. Turn north and you’ll be at door #1. Enter it to trigger the switch and you’ll be back in Sorpigal. Save and get ready for switch #2.
Switch #2
Part of the path to switch #2 is the same as the path for switch #1 so don’t get confused. Go six steps north until you reach a brick wall, followed by two steps west until you reach another brick wall. Go one step north and then four steps west. This is where the path splits from switch #1. Go two one step north and five steps east, then one step north and five steps west. Now go one step north and two steps east, then one step north and two steps west. Finally, go one step north, three steps east and one step south to reach door #2. Hit the switch and you’re back in Sorpigal, again.
Switch #3
This one is different. Go one step north from the entrance, then one step west and one step south. Now you’re at the southern wall of the Astral Plane. Turn west and walk six steps to reach the southwestern corner of the area. Now turn north and walk fifteen steps north to reach the northwestern corner of the area.
From the northwestern corner, walk one step east, one step south. Then, walk one step east and one step north. Now go one step east and one step south again, followed by another step east and step north. Finally, go three steps east to get to the door #3 on your southern side. Enter, trigger the switch and go back to Sorpigal.
Switch #4
For switch #4, go one step north from the entrance, followed by two steps east. Now go one step north and four steps east. After that, go four steps north, two steps west, one step north and one step east. Next, go one step north, two steps east, one step south and one step east. Follow this by going two steps north, two steps west and another two steps north. Next, go one step east, one step south and another step east. Finally, go two steps north, three steps west and one step south to reach door #4. Enter, hit the switch and go back to Sorpigal.
Switch #5
For the final switch, go one step north, one step west and then 8 steps north from the entrance. Follow this by going one step east, seven steps south and three steps east. Finally, go two steps north, one step west, one step south, another step west and one step north to get to the fifth room. Enter it, trigger the switch and you’re out in Sorpigal.
The Final Room
Enter the Astral Plane one last time. Go one step north, one step west and one step south. You’re at the southern wall again. Go six steps west to get to the southwestern corner. Now go thirteen steps north, followed by five steps east. Next, go three steps south, one step east and two steps north. Finally, go one step east and two steps south to reach the final room!
Use the Key Card to enter it.
The End
Congratulations! You’ve completed Might and Magic Book One. Not many people did, even though it’s an excellent game.
Now that you did it once, you’re probably used to the interface and the shenanigans of the game, so you can do it again. Solve quests for the various lords, explore the world to find optional dungeons and locations.
Try your luck with an unorthodox party. You’ll probably need a healer with you, but maybe you can ditch your archer or rogue. Maybe you don’t need a knight, using two paladins instead. Feel free to have fun.
Extremely Short Walkthrough
Before we’re done, here’s an extremely short walkthrough to print out, for subsequent playthroughs.
- Go below Sorpigal, 1-2. Take quest.
- Go to Erliquin behind in, get next quest.
- Go to E-1, to Dusk, to 8-0, get next quest.
- Go to B-3, to Portsmith, to 12-2, get first hint.
- Go to D-4, to Algary, to 1-1, get second hint.
- Go to C-1, 15-15, get the Ruby Whistle.
- Go to B-3, to 14-2, enter the Minotaur Stronghold.
- Go to level 2, find the Dog Statue. Search it to get the Gold Key.
- Go to A-1, Castle Doom, take the secret Entrance.
- Find King Alamar, get the next quest and take the Eye of Goros.
- Go to E-3, get the password at 9-2 and use it to enter Castle Alamar.
- Confront the fake king, enter the Soul Maze and type in the name – Sheltem.
- Go to C-2, to the gypsy at 9-11 and write down your sings.
- Guess the signs in A-3; 6-4 to get the Coral Key.
- Go to C-4, use the coral key at 7-2 to enter the Volcano.
- Enter B.J. at the two dials to fix the teleporters.
- Use a teleporter to get to the Volcano God. Ask for a riddle and answer Gala to get the Key Card.
- Teleport to the Astral Plane, trigger all five switches and enter the last door. The end!


