I was getting really close to the end of Grandia yesterday. However, before I go to Zil Padon and gain access to the final area, I had one more optional dungeon to clear – the Tower of Temptation.
I Got Tempted at the Tower of Temptation

The chest icon is actually a secret shop, not the item stash.
The Tower of Temptation is a large dungeon hidden within the Savannah Wilderness, through a tunnel in a cliff side. You basically have to guess your way through the tunnel to get to the teleporter pad that leads to the dungeon. This place is large, complex and has a lot of secrets.
I Got a Game Over Screen
First off, I’ll say in advance that about half way through the dungeon, I put an easy fight against three of those flying brain enemies on auto-fight while answering the phone. Somehow, I managed to get a game over screen here. This made me rage a bit so I took a short break.

I still have no idea how I lost this battle. Justin must have gotten confused or something.
Later on, I decided to use Google to try and find some maps for the Tower of Temptation, but I didn’t get lucky. Because of that, on my second attempt, I decided to draw my own, so you’ll get them here. They definitely aren’t complete, and they definitely aren’t of high quality or even to scale, but they should help, at least a bit. Since I have maps, I’ll write about the dungeon map by map.
First, there’s the teleporter pad leading to the outdoor area. There’s a stash chest icon there which isn’t a stash chest at all. It’s actually a “secret” shop with some relatively decent items. I actually didn’t figure this secret out until after I cleared the tower. Just to repeat – the stash icon right before the Tower of Temptation is not an item stash, it’s a secret shop.

The Tower starts out simple. The outside is almost empty and the first level is split into four small sections.
After that, there’s the outdoor area, leading to the first level of the Tower of Temptation. It’s just a big, circular area, with four entrances to the first level, a bunch of annoying and low XP enemies and the only save point in the entire dungeon. Most of the enemies can be avoided and this is probably the best option because they give crappy experience. They do drop permanent stat gain items, though, so it would be worth to fight them if my goal was to maximize all of my characters. I decided this won’t be my goal, though.
The first level of the Tower of Temptation actually consists out of four separate parts. The western part had four rooms behind illusionary walls with some enemies, an altar or something I never figured out and a random item or two. The northern section has less of the same. The eastern section is the most important one. It has plus symbol I picked up, which then activated a switch in the neighboring room. It also has a teleporter pad, leading to level 4 of the tower and back. In order to use it, I first needed to activate it from level 4. Finally, the southern section contains a room with the stairs to level 2, behind a locked door which I opened via the switch in the eastern section.
I Solved the Elevator Puzzle
The second and third levels of the Tower of Temptation worked as one puzzle. It was basically a labyrinth of one-way elevators. I started out at level 3, had to use all the elevators to get all of the items and eventually got to the outside (Rampart 1) of level 2, which finally got me to level 4. It’s hard to explain, but I color coded the elevator arrows to make it easier to understand.

Levels 2 and 3 might be confusing at first, but once I understood what was going on, it was easy to lay it out.
Level 4 of the Tower of Temptation is a single puzzle, consisting of locked doors which opened after I pulled the relevant switches. Again, there isn’t much to write about. I color coded the switches with the doors they opened up. There’s a lot of one-way streets here, which are marked with arrows. Some of them are always one-way, while some of them can be traversed both ways once a switch is pulled. The pink switch can be turned in one of four directions, which affects the door it will open. All the way up north, there’s the teleporter pad leading back to level 1. I used it to go down, heal and save at the save point, before going back here. Level 4 leads directly to level 7.
I Solved the Moving Room Puzzle
Since I got from level 4 directly to level 7, it was obvious the next three levels worked together, just like 2 and 3 did. This time, it was a bit different. From level 7, I had to open the blue door to go down to level 6. From then on, I kept switching from 6 to 5 and back, using switches to change the orientation of plus shaped rooms, so open up new passages. This eventually got me into another area of level 7, where I then had to use colored switches one after another to finally open up the way to level 8. The important part here is that the second room-switch system of level 6 is the first point of no return of the dungeon. After this point, the only way to go back to the previous areas is to enter the dungeon from level 1 again, or technically, level 4, since the shortcut will always be available.

You start out at level 7, then go down to 6 and figure out 5 and 6, before going back to 7.
I “Solved” the Trap Door Puzzle
Levels 8 and 9 of the Tower of Temptation again worked as one puzzle. First, I went straight to level 9 from level 8, since the room I started at was isolated from the rest of level 8. Level 9 was one large central room with several passages arranged in a grid around it. Each passage had a trap door which dropped me to level 8. Dropping down meant fighting enemies, but it also gave me the chance to find items, so I color coded some of these drops to show where they take me. I didn’t explore all of them though and I never fully explored these two levels either.
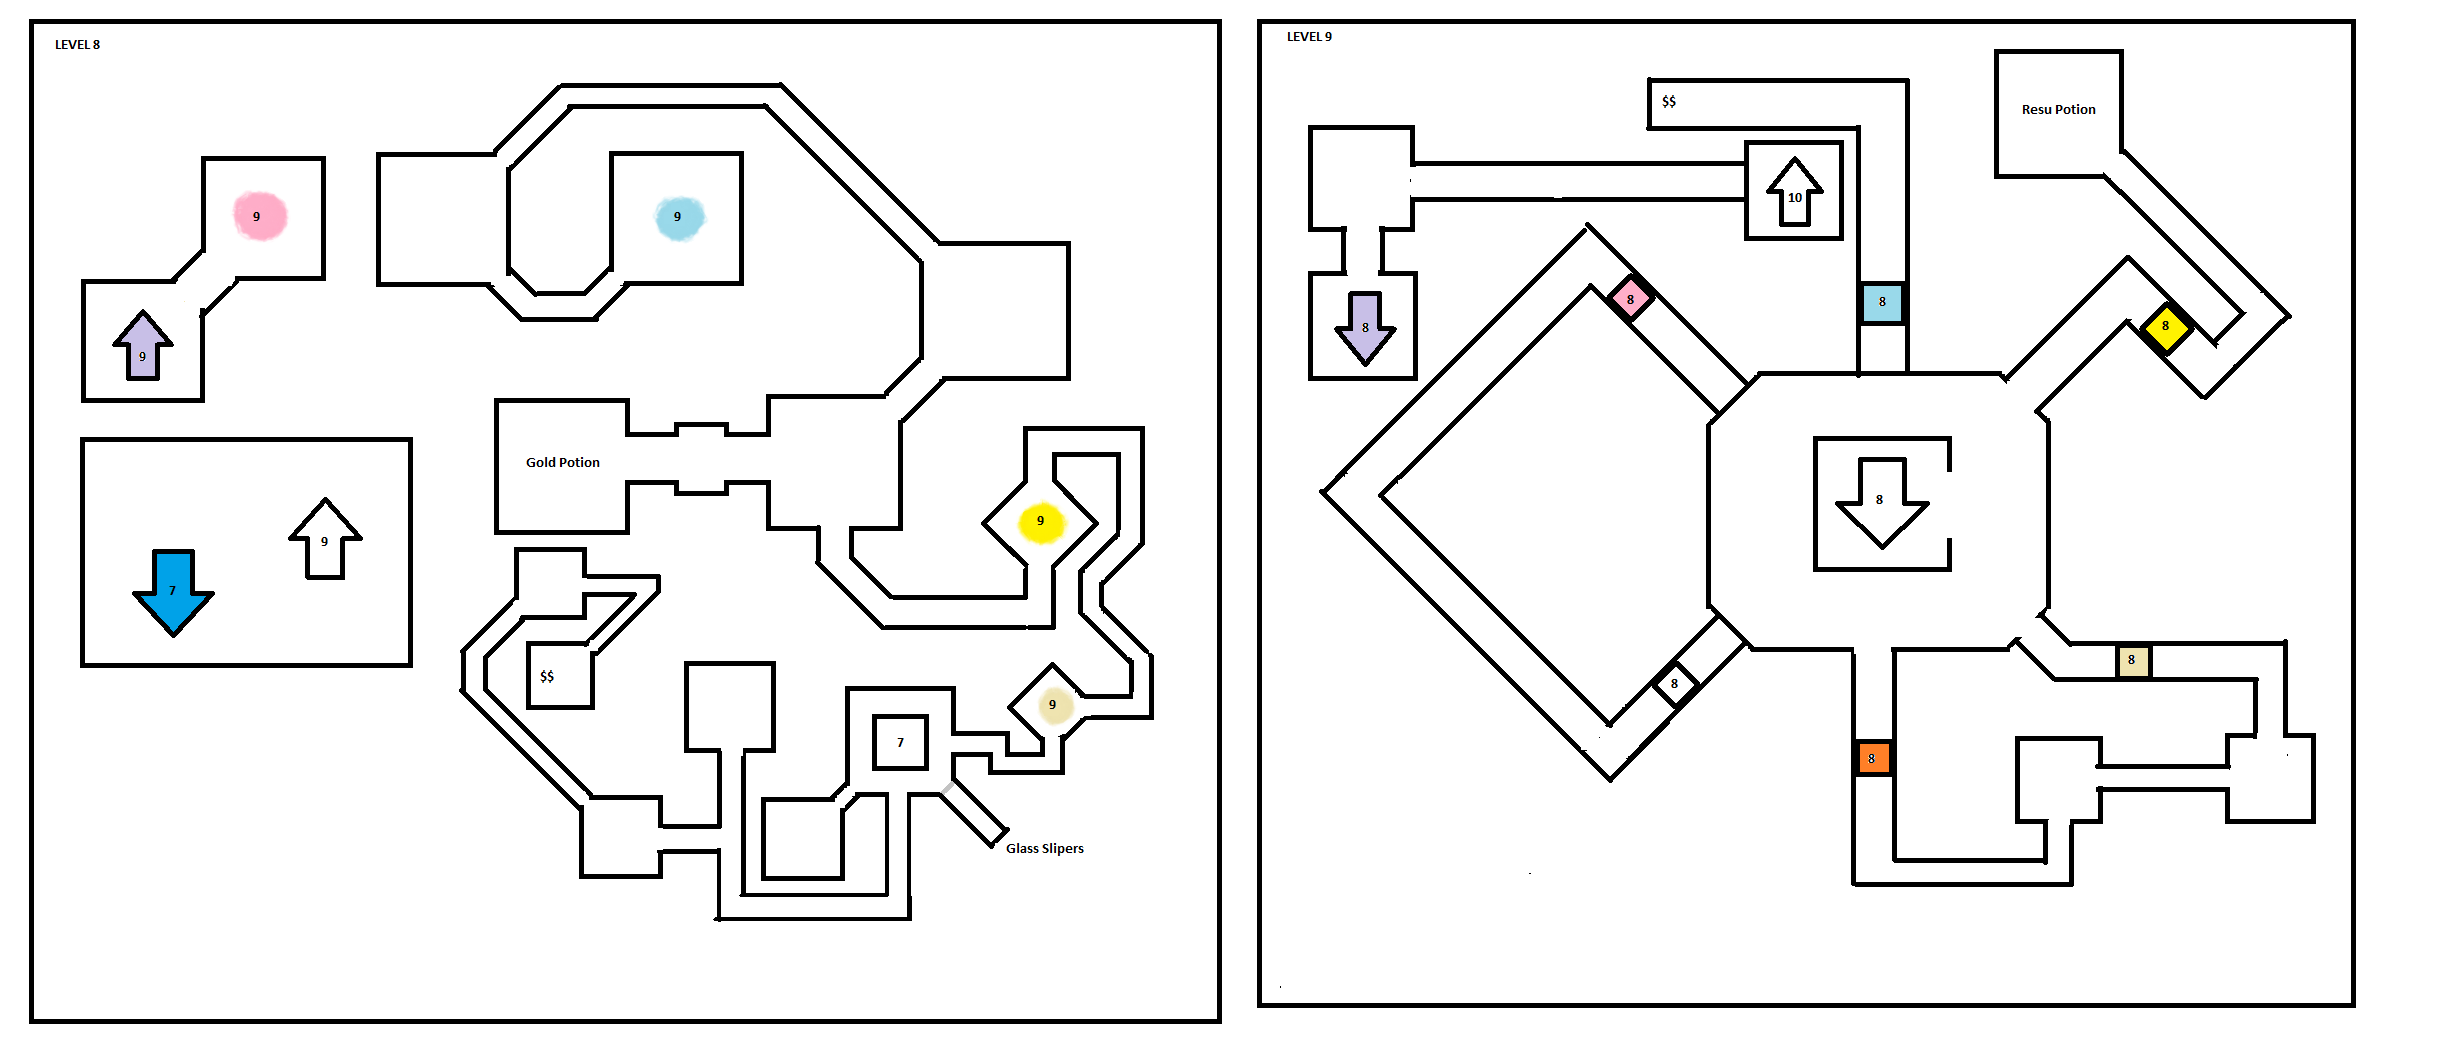
8 and 9 are the final two maze levels. After that, it’s just bosses until the top.
Dropping to level 8 meant I also had to drop to level 7 before I could go back to level 8 and then back to level 9. There’s another point of no return here, at the northwestern passage of level 9. Falling through the trap door there got me to the stairs to level 10. This would be the pink trap door on the map. For some reason, on each of my runs, I forgot about this point and because of that, never got to explore everything here.
I Fought Bosses
After level 10, there were several more levels, but each of them was just a boss and a passage to the next one. The bosses were easy to beat to. I didn’t have any trouble with them, mostly thanks to Justin being able to spam Dragon Strike at will. By the way, Justin also learned the Heaven and Earth strike, which is absolutely awesome, but it uses to much SP for me to spam it and the Dragon Strike gives better experience anyway.

Heaven and Earth looks awesome and does awesome things, but it’s only meant for boss battles.
I Got the Prize
Once I finally got to the top of the Tower of Temptation, an insane amount of loot was waiting for me. Here’s a list of everything interesting I got in the tower:
- Staff of Life – a nice staff for Liete, but it wasn’t a huge upgrade. I got it in a dead end room at level 3.
- Earthen Ax – supposedly, the best ax in the game, but most of the enemies in the tower were resistant to earth, so I didn’t use it much. This was in another dead end room on level 3.
- Hurricane Belt – + 50 action belt. It’s great, but later on, I realized I can buy it. This was in a dead end room on level 2.
- Moonlight Shield – same as above. A nice shield, but I can get it in the shop. This was behind an illusionary wall at level 6, next to a drop to level 5.
- Demonslayer Boomer – I didn’t get this on my first try, or my second one. I had to visit the dungeon three times to finally figure it out. This awesome ranged weapon for Rapp is just before the first point of no return. The second switch that turns the room around actually needs to be used three times first to get to the room with the boomer and only then used twice more to open the passage onward, past the point of no return. This is a great weapon, very useful against the demon enemies in the tower.
- Spirit Staff – this is another nice staff, but not a huge upgrade. I found it in a secret, dead end passage on level 7.
- Glass Slippers – a nice shoe item for Liete. I got these on level 8, in a secret passage right next to the room with the huge trap door to level 7.
- Sonic Belt – +75 action, which is amazing and better than the Hurricane Belt. I got it on the top floor, from a chest hidden at the end of the western passage, starting right next to the stairs from the previous floor.
- Fairy Tiara – a great head item for Liete. Got it from one of the reward chests at the top of the Tower.
- Ring of Rage – restores SP when the character gets hit. Another reward item.
- Ethereal Miracle – doubles weapon skill experience gain. Awesome reward item.
- Astral Miracle – doubles magic skill experience gain. The other awesome reward item.
- Holy Crown – a great helm, which I think I put on Feena, but I’m not sure. Reward item.
- Hertz Spike – the best mace of the game. I got it from one of the reward chests and immediately put it on Justin. It does awesome damage and it can cause sudden death on hit.
Other than these items, I also got plenty of stat ups, blue and gold potions, revivals and resurrect potions. Overall, getting through the tower was more than worth it, I just wish I didn’t have to do it four times in total, before I finally got all I wanted.

The layout around the prize chest is a nice touch. It adds to the sense of achievement.
In any case, now that I got the Tower of Temptation out of the way, I could grind for a bit, but I think I’ll just complete the game instead. Tomba! has been waiting for long enough. I’m now just an hour or two away. Maybe three.


