The next step of my preparation for the finale is completed.

Surprisingly, I already had most of the items needed for most of the weapon upgrades. As expected, the item that took the longest to get was the Adamantine. I believe I needed a total of three for it. One to upgrade Squall’s gunblade to Lionhearth, one for Selphie’s ultimate weapon and one for someone else, Irvine, I believe. Rinoa had her weapon upgraded for a long time now, Zell had all the items needed as soon as leveling was done and Quisits was only missing a common item I could get from the huge claw enemies at the Centra continent.

Final Fantasy VIII, Iron Giant

Sadly, a lot of the enemies I needed items from are rare encounters, meaning I had to fight others to.

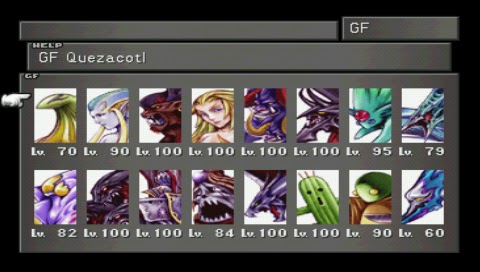
What I needed to do now was to properly distribute my GFs so all of the characters would have the ability to junction most or even all of their attributes. After some playing around I wound up with Shiva, Diabolos, Pandemona, Bahamut and Doomtrain on Squall. He would be my mugger, while still having plenty of physical damage and speed.With all the stat level bonuses and the final weapon upgrades, all of my characters had their strength above 150 without any junctions, with some even far exceeding those values. As for the other stats, their HP was slightly above 6000 unjunctioned, and the rest of their primary stats were somewhere in the 100-150 range.

For my fighter, which can be Zell, Irvine or Quistis for now, I went with Quezacotl, Ifrit, Cerberus, Alexander and Cactuar. This gave him plenty of strength while still being able to junction everything on needed. The reason the three above characters are more suitable for physical damage is due to their limit breaks. Zell and Irvine use physical damage in their desperation moves, and I also believe Quistis has some blue magic based on physical strength.

As for my healer/mage, I went with the rest of the GFs – Siren, Brothers, Carbuncle, Leviathan, Tonberry and Eden. The spell casting character needs plenty of magic bonus abilities. Again, the junction abilities available to him or her still cover most of the attributes. Again, due to the limit breaks, I think Selphie and Rinoa are more suitable to be healers.

Of course, this role assignment only makes sense now, when I don’t have a full supply of high level spells yet.  Once I stock up on everything, the roles will become meaningless and everyone will excel at everything. This is my next goal.

It took some TV watching and mindless button pushing, but I finally got the last character, Selphie, to level 100. It took longer than necessary to. At one point, I became careless so I didn’t save for a while. A lucky Marlboro managed to kill my entire party, so I was set back about 20 levels.

Final Fantasy VIII, All Characters Level 100

No more leveling!

While we’re at it, I should also mention that all of my GFs other than Eden have reached level 100 as well. She’s only at 84 for some reason, but she has all the abilities I need, so I’m fine with that, since I’m not really using them to do damage anyway.In any case, the grinding was done, so the first thing I did was to use a tent and save my game. The second thing I did was to buy a whole bunch of amnesia greens and delete all the GF abilities I won’t need any more. The stat bonus abilities were the first to go, of course. After that, I went through each GF that was at 9999 health and saved my game before trying to delete the lowest GF HP bonus ability and check if the HP went bellow 9999. This cleared some more room in the GF ability department, allowing me to move on with my plan.

Final Fantasy VIII, Most GF Level 100

Some leveling, but nothing to focus on.

Finally, once all of that is done, I will be going to the Lunatic Pandora to complete the game for the first time ever!My next goal is to upgrade all of the party’s weapons to their maximum levels. To do that, I need to roam around the world for a bit, to gather up some items. Once that’s done, I will be stocking up on high level spells for junction and finally refine some ability items so all of my characters have good ability coverage with their GF.

Over the last few days, I’ve just been spending a minor amount of time leveling my characters on the Island closest to Hell. It’s a tedious job, but I really want to get everyone too level 100 before moving on to the game’s finale. Sadly, the only way to do this effectively is to level one character at a time, with Bahamut and Cactuar junctioned to him or her, so I can also bind the four primary stat bonus abilities to them.

My plan is to first get everyone to 100, then stock up on spells and get everyone’s weapons upgraded and only then go to Lunatic Pandora and further. For now, I’m getting close to being done with leveling. Four of my six characters are at 100, one is at 50 and the last one, Selphie, hasn’t been touched.

FInal Fantasy VIII, GF Screen

The GF are getting there to.

I really can’t stress how important Quistis is for this strategy. Her Degenerator blue magic makes every fight a fast victory, apart from the few where a Marlboro attacks me from behind and I’m forced to run away. I’m also stocking up on some very nice and useful materials, which allow me to refine a nice supply of strong spells as well as medicinal items.

Leveling doesn’t take a lot of my attention, so I’m able to do it while watching TV, or doing something similar. I’ll probably be done some time tomorrow and move on to weapon upgrades.

Now that I only had the final bosses remaining, there really wasn’t any reason left to further postpone leveling up. My intention was to do it strategically, though.

First of all, I needed Cactuar and Bahamut. Cactuar has the Str, Vit, Mag and Spr Bonus abilities. These abilities increase their respective attribute by one on each level increase, as long as they are bound to the character. Bahamut has the Ability x 4 ability, which allows me to bind up to four abilities to a character, meaning I could bind all four bonus abilities.

There is a fifth bonus ability, though – HP Bonus. I decided to skip that one, simply because I could easily junction health and even use other methods of increasing it, such as the Devour command ability.

Now, since I could only attach all four abilities to a single character, I decided to level one character at a time, by killing the other two and leaving them dead. The obvious first choice was Quistis, for one amazing reason. Her desperation move is Blue Magic and one of the spells she can learn is Degenerator. Degenerator outright kills a single enemy, with no exceptions. This ability makes Quistis the perfect character to level first.

Final Fantasy VIII, Quistis using Degenerator

MPV, right here!

I got her to yellow health, bound all the GFs to her and killed of the other two party members. Then I landed Ragnarok and the Island closest to Heaven and started doing random battles, making sure my strongest spell is bound to her Speed stat. This way, I could easily kill any enemy I encounter with a single hit, before it could even act. Since the enemies on this island are all level 100, this meant getting up to three or even four levels per battle. Suffice to say, Quistis was level 100 in no time.

Of course, I had some trouble and needed to save my game often in order to be able to reload, but all in all, this was by far the fastest available method of leveling. Once Quistis was at 100, it was time to level another character. I junctioned Cactuar and Bahamut to Squall, but kept Quistis alive and at critical health. This time, I could go with an even safer tactic. I could now bind Iniative to Quistis, meaning she would always attack first, so there was almost no danger anymore. I think the average level of my party affects the amount of XP the party gets, though, so Squall took a bit longer to get to 100, but still insanely fast.

After Squall, it was time for Rinoa, but it seemed it all went even slower, due to Squall being level 100 and me not being able to replace him with a lover level dead character. Sadly, it seems I made a mistake by leveling Squall second. Luckily, it’s still quite fast, so it’s not a huge mistake.

Anyway, I didn’t get Rinoa to 100 yet. She’s at about 50 now and I expect her to reach her max level some time tomorrow. If I get the chance, I intend to max out another character to. From what I understand, I will be forced to use all of my characters for the final battles, so they all need to be maxed out anyway.

The Shumi Village is an optional area with an optional line of two quests. The first quest could’ve been done as soon as I was able to travel around with the Garden, but I forgot about it then, so I decided to do both quests now. The Shumi are Norg’s people. They aren’t human and their biology is very different to that of humans. They start out as regular Shumi and, after a while, evolve either to Elder’s such as Norg, or to Moombas, the little lion guys that I’ve met throughout the game.

Final Fantasy VIII, Shumi Village Elevator

The elevator ride is long, annoying and has to be repeated several times.

Next up, I used the elevator to go down and start up on the first quest. The Shumi took care of Laguna, Ward and Kiros after their cliff drop years ago. They have a tremendous amount of respect for Laguna, so they want to make a statue of him. For that, they need special rocks which I had to gather. I was the one to do this because the village elder wanted to give me a gift, but couldn’t unless I do something for them.The first thing I did was to pay 5000 gold at the village entrance to access the draw point which contains Ultima. Ultima is by far the strongest spell I can junction to anything, so 5000 gold per draw is definitely worth it.

In any case, all the rocks could be found around the village, one by one, so I’ve spent some time gathering them. None of it really gave me any trouble, since I remembered the locations from my first play through. The reward for gathering all the rocks was to see the Elder’s hand. Lucky for me, I also got a souvenir as I was leaving – a Phoenix Pinion. This one, if I remember correctly, summons the hidden GF Phoenix, which resurrects all of my fallen party members.

Final Fantasy VIII, Shumi Village

There was a lot of running back and forth, but it was worth the final prize.

The next quest involved the statue again. The Sculptor lost interest in completing it, so I had to first convince him, and after that the Artisan as well as the Attendant to help him. The Attendant was simple enough, but in order to convince the Artisan, I had to go all the way to Fisherman’s Horizon to get a special item. The reward for this quest was a Status Guard, which teaches any GF the ability Status Defense x4. Definitely worth it!

My preparation for the final push to the game’s ending began, and the first thing I decided to do was to gather up all of the GFs.

For some reason, I went for Cactuar first. To get it, I needed to defeat Jumbo Cactuar on an adjacent to the Esthar continent. I entered the battle unprepared and forgot to remove my Card command or to add an Item command to any of my characters. What happened was inevitable. Squall was the only character with the ability to resurrect in any way and he got killed first. Since Jumbo Cactuar has an attack that outright kills you, doing 10000 damage, it was game over pretty soon.

Final Fantasy VIII, Cactuar

10,0000 Needles kills anyone, for obvious reasons.

Next up was Odin. Odin isn’t a true GF, meaning he doesn’t exist in the GF menu and can’t be junctioned to a character. Instead, he just appears at the start of random battles and gives you an instant victory. I’m not sure if it can happen in boss battles, but it definitely happens quite often against regular enemies. In order to get him, I had to solve a timed puzzle at an optional area of the Centra continent and then defeat him in battle.On my next attempt, I was ready. The difficulty of Jumbo Cactuar is that his health goes up insanely fast compared to your level. Since none of my characters were above 20 at that point, though, I really didn’t have that problem. It still took me a while to empty his 64 000 health pool, but I eventually did it.

Final Fantasy VIII, Odin Fight

Odin never attacks, so this fight is just a time race.

At the same area, there was another GF to get, this one extremely useful. After I got Odin, I’ve spent some time fighting the only enemy that appears in the area – the Tonberry. Killing about twenty of them causes their king to appear. Winning that battle causes him to join the party as a GF. Tonberry has the useful “Call Shop” ability, which allows me to shop from anywhere. He also has the ability to reduce prices and add rare items to various shops.

Next up was Bahamut, which can be acquired at the start of an optional area in the southwest corner of the map. It takes getting through two battles against Ruby dragons and then defeating Bahamut himself to get him, but it’s worth it. This one, like Cactuar, is also much harder to get at a higher level, but again, I didn’t have this issue.

Final Fantasy VIII, Bahamut Battle

Bahamut was way easier than Cactuar

Since I was already at the ruins, I decided to try and get the strongest GF of the game – Eden. Eden can be drawn from Ultima Weapon, which is an optional boss at the bottom of the ruins. This is definitely the toughest boss I’ve fought up to this point, but after a few attempts, I managed to beat it. It hits much harder than Cactuar, but its health is slightly lower. Eden is a GF with no 9999HP damage limit, reaching over 20 000 damage easily at higher levels, which makes getting it very worth it.

Final Fantasy VIII, Ultima Weapon

Ultima weapon uses Cloud’s ultimate weapon from Final Fantasy VII

The last one I was missing is Doomtrain. In order to get this one, I needed the Solomon’s Ring, which can be found at tears point, bellow Lunatic Pandora. Once I got the ring, 6 Remedies+, 6 Steel Pipes and 6 Marlboro Tentacles, using the ring caused the GF to appear and be added to my party. Probably the hardest part was getting the Tentacles, since the only place to fight Marlboros was at the Islands closest to Hell and Heaven, where they were at level 100.

What I tried was to use Initiative and Mug on one of my characters to steal the tentacles and then run away from combat, but it simply wasn’t working. Eventually, I got lucky and Odin got triggered in a Marlboro battle. Since it was level 100, I got 8 tentacles from that single battle. As for the other two items, Remedy+ is made from 6 regular Remedies with the MedLVLUp ability, while the pipes can be stolen from Wendigos.

In any case, I had all the GFs I could get without having the PocketStation mini game.

The Review: Is A Link to the Past as Good as They Say?

Amazing! The Legend of Zelda: A Link to the Past is absolutely amazing!

I never properly experienced the SNES console era, and after this game, I truly am sad that I haven’t.

A Link to the Past Screen 1

Awww!

Legend of Zelda – A Link to the Past is truly an amazing example of what good game design and imagination can do. It looks beautiful and plays beautifully. It provides you with a sense of achievement every time you get past an obstacle it throws at you. It makes you feel stronger and more skillful, but at the same time, it constantly provides an adequate challenge.

By the way, I loved the ending and how all of the game’s characters basically say goodbye to you once you’re done. It makes for a bunch of extremely nice screenshots.Not many games get close to perfection as this one, and mind you, this isn’t nostalgia talking, since I never played it as a kid. Truly, truly, an amazing game. There really isn’t anything about it I would like changed.

A Link to the Past Screen 2

…or until the next game!

The music! I can’t believe I forgot about the music. The Legend of Zelda, the Final Fantasy and the Mario series probably have the most iconic music in all of gaming and for good reason. Most people remember the main theme of Zelda games, but the final victory theme is just as good, if not better.

The Verdict

It’s awesome! Play it!

Meaningless Score: 999/1

Once I approached the equivalent of Hera’s Tower in the dark world, the crystals broke the seal and opened the entrance. This was a huge dungeon, with several bosses of the previous dungeon reappearing to fight again. This is another way of the game showing me how strong I got since I started. Thanks to my sword and armor upgrades, most of these bosses died in just a couple of hits, without even touching me.

A Link to the Past, Red Mail

The game’s strongest armor!

Even though it’s the last dungeon, this one also had a special item – The Red Mail. It’s another armor upgrade, just as the blue mail was. I actually got the boss key and the armor quite early in the dungeon, even before the compass, which was very helpful and basically required to advance far enough before dying.

Eventually, I got to the wizard. The strategy to fighting him was still the same, except he now made three copies of himself to add extra attacks. I still only had to beat the real wizard, though, so it didn’t take long. After about five of his shots deflected back at him, he was down. Then, Ganon rose up from his dead body, turned into a bat and disappeared. Link followed him all the way to the Pyramid of Power, where the bat crashed through the roof.

A Link to the Past, Ganon

Ganon! Who knew!?

In the first phase, Ganon was just throwing his trident around, which was easy to avoid. After a few hits, he added a spinning fire circle and fire bats to his arsenal, which was much, much harder to get away from. I used the staff for some protection and kept hitting him until he started jumping around. I still had some magic, so I continued with the staff and the sword swings until he went invisible.Before I entered, I used my mirror to go to the light world and then my ocarina to get to the potion shop. I already had two bottled fairies, so I bought two blue potions to stock up completely. Then I entered the dark world and used the “Save and Quit” shortcut to get to the pyramid for the final battle.

At that point, I used one blue potion to refill my magic and hearts and then started using the Fire Rod to light up two torches, which made him visible for a few seconds. I kept hitting him with a sword, but it didn’t seem to go anywhere.

A Link to the Past, Ganon Defeated

I’m guessing it becomes less and less surprising in later games.

Then I remembered what I had to do in the original Legend of Zelda. I hit him with a sword, which got him stunned and then fired a silver arrow at him. This seemed to hurt him, so I kept repeating it for another three or four times and then it was over.

I won!

Before I went to get the final crystal, I decided to do my last bit of exploring. First of all, I went to the bomb shop in the dark world, which is located on the same spot where Link’s house was in the light world. The shop sold red bombs for one hundred rupies a piece. The bomb was not an item. It actually just followed me around like the chest I’ve already found did.

I bought it because I thought it would be an upgrade for my bombs, so I didn’t really know what to do with it at first. Then I remembered that cracked wall at the pyramid. I made the bomb followed me there and then ditched it at the crack. It exploded and opened a passage to another magical pond that accepts items.

A Link to the Past, Fat Fairy

I sure did!

I threw my bow and arrow and got the silver arrow upgrade. Then I tried my bottle and got a green potion. After that, I tried pretty much every item I could and it worked on just one. Boy did it work, though. The pond actually upgraded my sword!

After that, I used the light world transportation to get to the mountains and went to explore the area past the ruined bridge, which I could now access with the hook shot. I managed to find a lot of loot, but most of it was just bombs, arrows and rupies. Still, there was a heart piece, so it wasn’t all for nothing. Eventually, I got to the entrance of the last crystal dungeon, the Turtle Rock. In order to enter it, I had to solve a puzzle in the light world and then use Quake on the platform, to open the door.

Turtle Rock made me use the Cane of Somaria extensively. The Cane could be used to create platforms on certain spots of the level, which would then let me travel along the existing route. It also contained plenty of spiked floors and button puzzles.

A Link to the Past, Turtle Rock Boss

The middle head was the most dangerous one.

The boss made good use of my green potion. It was a turtle with three heads. The red head was hurt by the Ice Rod, while the blue head was hurt by the Fire Rod. First, I used the fire Rod to kill that one, then a combination of the Ice Rod and the sword to kill the red head. Once the two were dead, it turned into a snake which I had to finish off with my sword. Luckily, I saved up some magic, so I used the protective staff in the last phase to make it easier.

In any case, I got my last heart container and my last crystal. It was time to go and defeat the wizard.

At first, Squall listened to Rinoa and let the Esthar soldiers take her, even though it was tearing him apart. Once he met up with the rest of the team, though, they managed to seriously change his mind. I immediately went to the Sorcerer’s Memorial near Esthar, were Rinoa was about to be frozen. I got her out and the group was back together, for a while at least.

Final Fantasy VIII, Squal and Rinoa

I have to say, this whole conversation works.

Rinoa wanted to see Edea’s house, so I went there next. Squall and she had another nice moment where the quote from the intro cinematic is finally used. Basically, Rinoa has a recurring nightmare where she can’t find Squall anywhere, so he promises her he’ll be there, at Edea’s house so that, “if she comes there, she’ll find him”. Zell interrupts the moment saying they got a message from Esthar, inviting them to the president’s palace to discuss their plans. The group finally meets the president.

Surprise! The Esthar president is Laguna. His aides are Ward and Kiros. As official as that sounds, Laguna is still the same “moron” from the first dream sequence. He loves to talk, never plans anything and doesn’t really understand things. He’s a nice guy, though, so I guess that makes him an OK leader. He lets Odine explain the plan. I’ll give it my best shot…

Final Fantasy VIII, Laguna, Ward and Kiros

They haven’t aged a day!

Ultimecia is a sorceress from the future. In her future, everything is destroyed and only she exists. She wants to get to the present, but she needs Ellone’s ability for that. We can’t kill her, though, since she’s actually in the future and only uses hosts in the present. There’s a trick to get to her, though – time compression.

Basically, we get to Adel, since Ultimecia will be using her now. We kill Adel and Rinoa accepts her powers. Rinoa then lets Ultimecia into her mind and Ellone sends Rinoa further to the past. She then pulls Rinoa out, which somehow causes the future and the present to merge, so the group has access to Ultimecia’s body, so they can finally kill her.

I have no idea how that works, I even have no idea if that’s the whole story, because I couldn’t remember all of it, but I think I got the gist of it. Suffice to say, Final Fantasy VIII gets extremely complicated before the end.

In any case, everything that needed to be done before the final area has been done. All that now remains are the optional quests, items and areas, which I will definitely have to visit if I want to stand a chance of beating the final area. Compared to the rest of the game, the final area of Final Fantasy VIII get’s insanely hard.