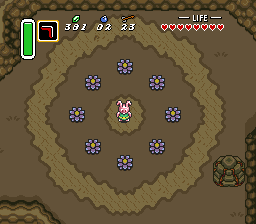
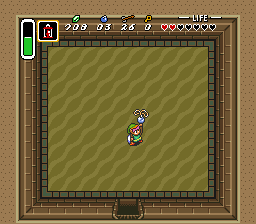
As I said, getting the Titan Gauntlet in the last dungeon meant I had some exploration to do. First of all, I went down to where the race mini-game was in the light world. In the dark world, it’s replaced with the digging mini-game where you play 80 rupies for 30 seconds of digging. Since my experience tells me these sort of mini-games contain special bonuses like heart pieces, or even heart containers, I decided to try my luck for a while, but I didn’t get lucky enough. After a couple of hundred rupies spent, I decided to give up for the time being.

Instead, I went to talk to the frog one screen before the mini-game. The route to it was blocked by an extra heavy boulder, so I couldn’t do it before. The frog asked me to take it to its partner, somewhere in the village. I went through every house, but nothing. Then I went one screen east, where I remember a dwarf was missing a friend in the light world. The dark version of the house was destroyed, but I got an idea.

A Link to the Past, Dwarf Frog

The frog was a dwarf. Is that racism?

I used the mirror and it worked, which makes me wonder why I couldn’t use it with the kid in the forest, instead of him turning into a tree. I guess you shouldn’t think to hard about Zelda games. In any case, the dwarves were reunited and they offered to temper my sword for 10 rupies. I had to move a couple of screens before the sword was ready, but it was well worth it. The Master Sword is even stronger now.

A Link to the Past, Upgraded Master Sword

Master Sword +1

In the dark world, their house was ruined, but a chest was in it. I couldn’t unlock it, though. Instead, the chest started following me. Now, I’ll be honest here, I had no idea what to do with it, so I succumbed to the Internet. The chest was supposed to go to the light world, to the man at the entrance to the desert area. He unlocked it for me and it contained an extra bottle. Great, now I have four empty bottles because I keep forgetting to fill them up.

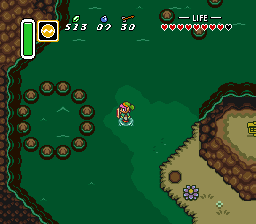
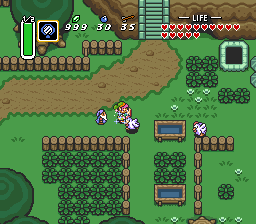
Since I was relatively close to the lake, I decided to go spend my 999 rupies to upgrade my bomb and arrow containers. You see, I forgot to mention this, but at the central island in the lake, there was a pool where you can throw rupies in for luck. For every 100 you get rid of, a fairy pops up and offers to increase your maximum bomb or arrow storage by five. Since I can’t go above 999 anyway, it’s a god place to spend extra money at. I upgraded both of my containers to fifty and then lifted the one heavy rock on the island.

It uncovered a portal to the dark world, which led to the area right in front of the next dungeon. A happy coincidence?

I love the way this game plays out.

The next dungeon took me a bit to find, but it wasn’t too hidden. The statue at the village square had a trident I could grip and pull out, which opened the entrance. Again, this dungeon was different.

The first area consisted of four huge rooms, both with two different levels and randomly interconnected passages. It required plenty of walking back and forth to get access to different parts via alternate routes. I got the map, the compass and the boss key, all in the same room. There were also a couple of other chests containing rupies and other random items.

A Link to the Past, Fourth Crystal Dungeon

Compared to the last, this dungeon was a lot more homely.

Once that was out of the way, the next area had a second floor, as well as a basement. I went to the second floor and cleared it, but there was nothing there, that I could see. Then I went to the basement and found a girl trapped in a cell. I was supposed to escort her out, but I decided to explore the rest of the cellar first. It was worth it.

In one of the rooms, I found the Titan Gauntlet. This one allows me to lift even the heaviest rocks and boulders, so there will be a lot of exploring after this dungeon. I wasn’t done yet, though. I escorted the girl to the ground floor and then stopped by the boss room before taking her out. Nothing was there, though. I tried to go back to the second floor, since something was bound to be there, but the girl left me before I climbed the stairs.

Because of this, I was sure something was there. That’s when I realized one of the most basic things. You can lift and throw bombs. I have no idea if the Titan Gauntlet allowed me this, or if I was just clueless, but this was honestly the first time I figured it out. With that knowledge, I knew what I had to do.

The second floor had a room at the end of it. Part of the floor there was crumbling, but it was surrounded by walls, so I couldn’t place a bomb on it. I could, however, throw one. Since the room was right above the boss room, I went back there next, but the boss was still absent. The light from the hole above was shining through, though, so that bomb definitely did something.

I was thinking the girl might have something to do with it, so I went back to the cellar to pick her up again. I got her to the boss and the relatively predictable thing happened. When she walked over the light, she turned into the boss.

This one gave me a lot of trouble, because again, I forgot about using my defensive items. After a couple of failed attempts, I finally remembered to use the protective staff and after that, the boss was easy. I just had to hit his head and avoid the rest of him. To be more precise, I had to hit the one attached to his body, because by the end of it, he had two extra floating around.

A Link to the Past, Inventory Screen

I guess I’m almost done gearing up.

So why do I love how the game plays out? Because when I first entered the dark world, it was hard as hell. Now that I got some gear and familiarity, I actually feel more powerful playing through it. I love when the game works that way instead of just making everything harder as you get stronger.

I love how each dungeon has a peculiarity attached to it. The Skull Woods dungeon had a different way of navigating through it.

Basically, there was no main entrance. Instead, it had several different entrances, as well as holes you can fall through to access different areas. The navigation was still relatively linear, though. I fell down one hole, which got me access to an exit, which got me access to another hole, and so on. Eventually, I got to the map, as well as the compass, and finally, I got the boss key.

A Link to the Past, Skull Woods

Lots of switches and pits in Skull Woods

The boss was a moth, so it was also weak to fire. It was moving fast, however, so I ran out of magic mid-battle. All in all, it took around seven or eight hits with the rod, as well as a couple of hits with the master sword to kill it.This unlocked an awesome new item – the fire rod. The toughest enemies in the dungeon were mummies and these would now go down in one hit of the fire rod, at the cost of a tiny bit of magic. Getting the rod also gave me an ability to burn the obstacle keeping me from the boss area.

A Link to the Past, The Third Crystal

Crystal #3

In any case, I killed the boss, got another heart container and another crystal. The fifth dungeon is supposed to be in the middle of the Outcast Village.The thing I keep forgetting is to use all of my items. I probably would have done better against the boss, had I used the protective staff and just stick to my sword for offense. I just keep forgetting to use all the awesome items the game gives you, which is making my life a lot harder.

Today, I’ve mostly spent a lot of time exploring both the light and the dark world. I realized I can use the mirror to switch to the light world at will, so I’ve been using it to go back and forth. For a short time, a portal back to the dark world remains on the spot where I use the mirror and if that goes away, I can always use one of the fixed portals scattered around the light world.

I’ve been picking up some heart containers as well as heart pieces, but mostly, I’ve been looking for areas I can access through world transfer. For instance, there’s an island at the lake with a heart piece on it, but I could only get to it by standing on that spot in the dark world and then using the mirror.

A Link to the Past, Quicktravel, Map

Quicktravel existed even in the classics.

I got there and found is grandfather at the inn. He told me to go and play it at the village square. This caused the bird statue there to come alive. Now, every time I play the flute, the bird can transport me to one of several areas of the light world.Eventually, I got to the forest where a kid was playing a flute in the light world. In the dark world, the same kid was there, but transformed into an animal. He said he missed his flute very much and asked me to retrieve it from the light world, using the shovel he gave me. I got there and eventually found it, after lots of digging. Sadly, he couldn’t play it anymore due to the transformation, so he decided to let me keep it and asked if I could maybe return it to his family at the village.

After this, I did some more exploring in both dimensions and managed to get two more items. One was a magical cloak that drains my magic power, but keeps me invisible for the duration. The other was a magical staff which creates a protective shield around me. For this one, I had to use the magical cloak to get it.

Both of these drained magic power like crazy, but luckily, I’ve found a cauldron just east of the village in the light world. Using the magical powder on it caused a creature to appear, which cast a spell on me, halving my magic power expenditure, regardless of items.

A Link to the Past, Bombos Medallion

The Bombos Medallion casts a useful fire spell.

The dungeon wasn’t too bad. I’d even say it was easier than the previous one. The best part about it, though, was the loot. I finally got the hook shot. This awesome item can pull me towards pots, skulls, chests and other similar items, allowing me to get across gaps or just move very fast.Eventually, I decided it was time to go clear the next dungeon – the Swamp Castle. I had to find the entrance first, though. It was at the same place where I could drain part of the swamp in the light world. After some messing around, I realized that draining the lake also transfers to the dark world, so that’s how I discovered the entrance.

A Link to the Past, One-way Switch

A new type of switch was introduced here.

The boss was easy enough. The first phase required me to use the hook shot, while the second phase was just the standard “avoid and hit until it’s dead”. I got my heart container and the third crystal. The next dungeon is supposed to be at the Lost Woods, or Skull Woods, as they are called in the dark world.

After some exploring of the dark world and getting used to the new enemies and the damage they deal, I finally decided to go to the Dark Castle, the next dungeon I’m supposed to go to. Before that, I’ve found a circle of stones in water, at about the same spot where the Zoras are in the light world. I threw a skull in it and a creature gave me a new weapon; Quake Medallion, I believe it was called. This spends close to a quarter of my magic power, but it does some serious damage to all the enemies on the screen.

A  Link to the Past, Quake Medallion

It looked like a target, so I threw a skull in it.

On the way to the dungeon, while going through a maze, a talking monkey started following me. He asked for 10 rupies in order to follow, which I accepted, thinking it isn’t much and it might be worth it. He followed me all the way to the dungeon entrance, which was closed. Then he offered to open it for another 100 rupies. Of course, I accepted this as well.

A Link to the Past, Monkey

As usual, I forgot the monkey’s name.

The dungeon was full of hard enemies and some pretty tricky puzzles that gave me some trouble, but I managed to get through it. I was stuck at one part for an especially long time, though. You see, you get a new item in this dungeon, a magical hammer. It allows you to defeat one of the dungeon’s enemies and it allows you to hammer various things into the ground in order to open up passages.

Well, one of the rooms contained a button which wouldn’t stay pressed no matter how many times I walked over it. Once I finally got the hammer and explored all of the other rooms, I was sure the hammer would “fix” the button. It didn’t work, though. I went back and forth, trying various ways of using the hammer, trying other items, basically all I could think of, but I kept focusing on the hammer. It never even occurred to me to try and push one of the statues in the room on top of the button. Sure enough, the closest statue was movable and I was able to continue.

A Link to the Past, Boss

Took me a while, but I managed to beat the boss.

Eventually, I got to the boss and lost to it several times. Again, the game confused me a bit. The very first hit with the hammer destroys part of his mask. The next several hits do nothing to it, even though they do damage, so I thought I was doing something wrong. Still, the boss did make a “I’m damaged” noise, so eventually I decided to just stick to it and keep hitting him. After about 10 or so hits, his mask was destroyed and then I finished him off with the bow.

I got another heart container, as well as the first crystal, containing the first maiden. She told me where to go next and marked it on my map.

As I said, I’ve got the sword, but Zelda was captured by the wizard.

I got back to the Sanctuary, where the priest was already dying. He told me the wizard took Zelda to the castle, so that’s where I went. The sword helped me break the seal I’ve seen at the beginning of the game and I entered the dungeon.

This one was pretty much straightforward and simple. I’m not going to say it’s easy, though, because it took a while to get to the end, but only because of the length. I got to the wizard just as he was apparently teleported himself and Zelda away.

A Link to the Past, Wizard

“Bwahahahaa! I waited so I could tell you you’re too late!”

The reality was, while Zelda was transported away, he actually hid in a room behind the curtain, so that’s where I’ve found and fought him. Thanks to a tip provided by the elder through a communication tablet in the castle, I knew I can’t hit the wizard directly. Instead, I had to hit the missiles he was launching at me to deflect them back at him. This was extremely simple, once I figured out the pattern. Basically, I needed to stand still and swing my sword on every shot, unless he teleported to the top center of the area. In that case, I needed to go up and to the side of him, to avoid the lighting.

I’ve beaten him, but he transported both of us to the dark world and that’s when I realized the game was only beginning. The elder contacted me immediately and told me I need to defeat him in the dark world to rescue Zelda and restore everything. In order to beat him, I need to find the seven maidens who can help me, each in one of the dangerous dungeons in this dark world.

A Link to the Past, The Dark World

Time to actually start the game, I guess.

Basically, I only got through three tenths of the game, if even that far. Oh well, time to get to the first dungeon. What I’m hoping at this point is that I will be able to go back to the light world before the game is over, so I can pick up everything I missed. I rushed to get to the castle, so I’m bound to have missed something.

By using the gauntlet, I managed to get to a semi-flooded area in the northeast, filled with those fireball spitting enemies that live in the water. As it turns out, these are the Zoras. Their king was there and he offered me swimming flippers for 500 rupies. Obviously, I wanted those, so I gave him the money. I was at 999 rupies for a while now anyway.

A Link to the Past, Flippers

I’d say something like “costly, but worth it”, but really, you HAVE to buy the flippers.

It was time to get to the third dungeon now. The map was clearly showing it as the tower to the north, so that’s where I went. My gauntlets allowed me to lift a stone and clear the way to a dark cave. Exploring it, I soon met an old man who asked me to guide him through it. It seemed more like he was guiding me, since he told me which direction to go to on several occasions. Eventually, we got out of the cave and to his house, which is now one of my “bases”, allowing me to start the game there upon loading.Using the flippers, I’ve found a couple of heart pieces, bringing me to 8 total (I believe) as well as a hidden cave with a pond. Throwing my boomerang in the pond caused a fairy to appear who then gave me an upgraded version of it. This one can travel a distance equal to the width of the entire screen. Hoping to get something else, I threw various items in and it worked. I got my shield upgraded to and I filled an empty bottle as well, getting a green potion this way.

I explored around his house and found a couple more heart pieces. I also found a magical platform which transported me to a dark version of the mountain and turned me into a bunny. In this dark dimension, I’ve found two other creatures and one of them told me I need the magical pearl from the tower to retain my original form upon teleporting to the dark dimension.

A Link to the Past, Dark Dimension

The dark dimension, and a bunny.

It took me a while, but eventually I figured out I could use the mirror the old man gave me to go back to my original dimension and my original shape. I used this feature to get another heart piece and then to get access to the tower, our third dungeon.

A Link to the Past, Third Dungeon Entrance

The entrance to the third dungeon.

This dungeon was relatively small in area, but had several floors I needed to explore. I didn’t get any new weapons or tools, sadly, but I did get the magical pearl I’ll need for the dark world. The boss of the dungeon was extremely annoying. He moves randomly and the only way to damage it is to hit its tail. The hard part is that the battle takes place on a platform you can fall off of and the boss pushes you around when you get hit, so it’s extremely easy to fall. Of course, if you do fall, he gets back to full health, so you have to start all over. Eventually, I somehow managed to beat it and got the third medallion, as well as my ninth heart container.

A Link to the Past, the Master Sword

The Master Sword

I now had everything I needed to get the Master Sword, so I went directly to the Lost Woods. The sword was where I’ve seen it before and now it was mine. As soon as I pulled it out of the stone, though, I got a message from Zelda, saying the Sanctuary is under attack.

Time to go rescue Zelda again.

After clearing the first dungeon, it took me a while to reach the second, even with all of the hints.

Well, as a matter of fact, the hints, at least the hints I’ve been getting from fortune tellers, weren’t really helpful. They keep telling about a Zora I’ll be meeting at the source of the river. This made me think the next dungeon is on the northern location, out of the two marked on my map, when it fact, it was the southern, in the middle of a desert. Eventually, I got there, but not before finding a bunch of heart pieces, putting me one short of a full extra heart.

A Link to the Past, Forest Clearing

Exploration revealed a spot in the woods, probably important for later.

The new dungeon, naturally, had a desert theme. Many of the enemies would hide in the sand emerging later, usually at an inconvenient moment. After a while, though, I got used to the patterns and started clearing rooms. The map was easy to find, with the compass second, quite far away from the map.

After a while, I’ve reached what I thought was a dead end, but then I realized I had to use one of the side exits from the dungeon to reach the second area. The big key allowed me to also get a new item, the Power Glove. This one allows me to lift the greenish rocks scattered around the world, but wasn’t really helpful with beating the boss.

A Link to the Past, Final Room of the Second Dungeon

The second medallion is mine!

The boss was familiar to me, even though I haven’t played the game. Pin, a boss from the Binding of Isaac, was heavily inspired by this one. The behavior is slightly different though. It moves much more slowly, since I have to hit him with a sword, instead of from range. Once he was beaten, I got the second medallion, the Medallion of Strength, as well as another heart container, bringing me up to a total of seven (and three quarters).

My session time was nearing an end, but before I saved, I took a quick search around the area, just to see what I can access with my new ability to lift rocks. I found a couple of hidden rooms, mostly containing minor treasures. All the way to the east, thanks to a tip I got from a bandit in a secret cave, I’ve found the Ice Rod, which allows me to freeze enemies, I’m guessing for longer than the boomerang, but at the cost of magic power.

After that, I returned to town and saved my game.

Remember my “Complete every Zelda game” challenge? The one I “started” months ago, but only got through the first game. Well, a person on reddit said they’re considering the same thing, so this made me think about continuing my own. I’ll be skipping Zelda 2 for now and going straight for “A Link to the Past”. Zelda 2 is not really like other Zelda games, so I’m not that eager to play it yet.

Compared to the original, there has been a lot of improvements in playability and user friendliness in the SNES sequel. You now have a proper, usable in game map as well as something akin to an objective tracker. There are also ways of learning where you should go next by spending rupies and hints on where the hidden rooms and items are. Overall, it’s much more polished and really allows you to focus on the game, instead of going around hardware and software limitations.

At the start, Link wakes up in his house in the middle of the night, with his uncle going somewhere. He hears the voice of princess Zelda in his head, asking for help, so he listens. The castle has been attacked and the castle mage is behind it. The game leads you to the castle and teaches you how to find your very first hidden passage, a hole beneath a bush.

A Link to the Past, Castle Door

The door to the castle was locked, and it will probably stay locked for a while.

Once Link jumps through, he finds his uncle injured and takes his sword. The area beneath the castle then serves as an intro dungeon. You learn some of the mechanics, find your first map and finally fight something of a mini-boss guarding Zelda’s cell. Link frees her and she follows him to the ground floor where they uncover a hidden passage. After some more dungeoneering, they finally reach the Sanctuary, where she will be safe. At this point, Link earns his first extra heart container.

A Link to the Past, The Sanctuary

This is the Sanctuary.

She asks Link to find a way to defeat the wizard called Agahnim. Apparently, he’s trying to open something called “The Seven Wise Men Seal”, which he shouldn’t do. To stop him, I’ll need the master sword and the people of the nearby village should know something about that. This is how the game leads you around throughout, so there’s no guessing, no map drawing, you just play.

I got to the village and was told their elder is in a place to the east. Before I went there, I explored everything and found a bunch of items. I got a total of four heart pieces, which gave me my fifth container, some bombs, some arrows, a bottle which allows me to store fairies in it and a net which allows me to catch faeries. Back in the dungeon, I already got the boomerang and back at home, I got the red lamp. All in all, I already have a nice assortment of items.

Once I was done exploring, I went to the east and spoke to the elder. He said he knows how to get the Master Sword, but Link needs to prove himself worthy first, which means he needs to find three magical medallions. The first is the medallion of Courage and it’s located in a dungeon nearby. Now, at this point, I’ve already found the Master Sword at the Lost Woods north of the village, but I couldn’t pull it out of the stone. I guess that’s why I need the medallions.

A Link to the Past, The First Dungeon

The first dungeon.

I got to the first dungeon fast enough and started exploring it. It wasn’t to difficult, but it takes time to get used to the game, so I had to restart at the first room several times. Thankfully, the mechanics work in such a way that the important part of your progress isn’t lost when you die, so eventually, I got the map, the compass, the big key and eventually, the Bow, which is the primary reward of the first dungeon. I used the bow to kill the first boss and got another heart container for it, as well as the Medallion of Courage. I returned to the elder and got information on where to find the next two medallions.

He also gave me Pegasus shoes, which allow me to charge enemies and knock things down. I immediately remembered a book on top of a shelf in the village library, so i went straight there to get it. The book allows me to read the ancient language inscribed, among other places, on the stone the Master Sword is stuck in.

I’m guessing I have to go to the next dungeon now, but before that, I’ll be doing some exploring, to see if my new shoes can get me anything else.

The first part of my new challenge was already completed a few days before I started to think about actually completing them all. The closest thing to the original Zelda I ever played was the Zelda Classic “remake” on the PC. It was basically a Legend of Zelda engine that allowed for custom quests and the original quest was one of them. I never finished it, though, since I was a bit younger back then and had very short attention span. I eventually wandered off the play various mini quests, including one involving the Neverending Story.

The Legend of Zelda Title Screen

This is where you hear the legendary music for the very first time.

A few weeks ago, I decided to download Nestopia and play through the game from start to finish. It started out badly. It’s been ages since I played any old school game of this type, so my reflexes were extremely rusty. For the life of me, I could not progress past the first few screens. I wandered around, killed enemies, died, wandered some more, killed some more, died some more and eventually, I managed to gather enough rupies to buy myself a new shield as well as the magic candle. The shield allowed me to survive for longer so, once I gathered some bombs, I managed to find my first heart upgrade.

With all of this, I felt confident enough for my first dungeon. Ages ago, I played Link’s Awakening on the original Game Boy and I remembered that this is how the game progresses. Well, playing Phantom Hourglass a while back also hinted at that, so it’s not like I was a complete newbie. The problem was, I couldn’t find the first dungeon no matter how hard I looked. I found the second one, I even managed to get to one of the later ones, but the first one was impossible for me to find.

This brings me to my first beef with the game. It needed a map, badly. Not for the secrets, not for the locations, just so I could know where the hell I am and where I’ve been before. Sure, there technically is a map in the game, but it’s completely useless. Lucky for me, I managed to find a spoiler-free overworld map, thanks to Tartarus of RPG Classics. With this, finding all the dungeons was a breeze.

Legend of Zelda - It's Dangerous To Go Alone

This line has been quoted, used and abused countless times.

I fought through dungeon after dungeon, making sure to explore the overworld after each new item and managed to clear most of them with relative ease. At a couple of points, I started finding the dungeons a bit to difficult, but after getting the Blue Ring from the obvious secret shop next under one of those several statues, I managed to get past those to. After all of that, I have to say one thing – I hate the knight enemies. I hate them with a passion. The mages in the final dungeons were difficult and annoying, but never as annoying as the knights.

Anyway, after getting a whole bunch of items and a whole bunch of hearts, I entered the final dungeon and boy was it difficult. I played through it for hours, constantly dying, but also constantly managing to get a step further than before. Once I got the red ring, things became a bit easier, but it was never a breeze. Eventually, though, I found Ganon and, since he was invisible, eventually figured out where to attack in order to damage him. I couldn’t kill him, though. I had no idea how. However, since I’m quite familiar with the various tropes you can find in entertainment, I figured I have to do something special one he changes colour. Thanks to one of the old men in the dungeon, I managed to kill him with the silver arrow, and that was it.

Legend of Zelda - Victory Screen

The ending is anticlymactic, really.

Except it wasn’t! Apparently, there’s a second quest. I’m not going through that one. From what I can tell, the differences between the quests are only in item and enemy placement, so I really see no point. I got through the story and I experienced the game fully as far as I’m concerned. I think A Link to the Past will be next.

Legend of Zelda – Final Impressions

So what are my impressions? All in all, they’re pretty positive. The Legend of Zelda definitely deserves to be called a classic. It innovated back then and it still innovates today. Sure, some of the archaic design methods pull it down a bit these days, but I still find it an above average game with fun and compelling gameplay. The music and sound is signature to the series, while the retro dialogue lines and story give it a nostalgic charm. I feel most gamers, young and old, should at least experience a Zelda game, and there’s no reason for this one not to be that game.

The first part of my Legend of Zelda challenge is complete.

On a side note, playing through this game made me truly realize how much of an inspiration it is for Binding of Isaac. It’s not just the room layout and the camera perspective. The enemies, the bosses, even the items of the Legend of Zelda are a huge inspiration to the Binding and its expansion. This makes me like both games even more.

Related Links